FREE EXPRESS DELIVERY on all orders over $50
Call us on+08 9229 8228
What's your build?

The Build That Started it All: Gary’s 1993 VR Senator, HSV454

To kick off our new series, we’re featuring the build that started it all… our lead Ninja Gary’s 1993 VR Senator, also known as HSV454.

The 1993 VR Senator – build number 065 – first came into Gary’s possession in 1998. Even for a man with a lifelong love affair with Holdens, the 1993 VR Senator was special.

Pre-HSV454 days, The Senator was always a dream car.

“I still remember when the VR HSV came out – the styling, interior, 185 kW, handling, there was just nothing like it, a car that truly competed with the best Europe had to offer.” Gary says.

Plus, he had a personal connection to it.

“It was built a few kms from where I grew up in Elizabeth, so I knew one day I would own one. This one was perfect, low km’s and hardly touched.”

‘The Senator’ became Gary’s daily drive for five great years, until it blew the transmission.

Unable to part with his beloved Senator, it was rolled into storage, waiting for the right time for a rebuild. It took a while, but the right time came in 2014 and the project began.

A sneak peek into Gary’s shed, which also hosts the infamous annual Bathurst party

Gary comes from a long line of petrol heads and tinkerers – he remembers long hours as a kid, watching his grandfather and father play with all things automotive. Add to the mix a long career in design drafting, and an undying passion for Aussie muscle cars, and the project became the ultimate labour of love.

Originally it was to be a simple LS3 conversion, then a bolt of inspiration hit when Gary read about the LSx454 motor in an issue of Street Machine.

Once Gary saw the LSx454, he knew he had to have it for his 1993 VR Senator.

“It was the capacity, for me, growing up as a kid, if you had 454 cubes, that’s it, you were king of the hill.  The LSx454, combines that magical number with the best GM has to offer in the LS platform, iron block, forged internals, priority mains oiling, and killer heads.” He explains.

Never one to do things by halves, Gary carefully considered every last detail on the build – some could say to the point of obsession.

80 hours of CAD work went into the rear wheels alone, with Gary designing up his own custom 10-inch rims that were machined out of billet in the very room that would later become the Build Ninja headquarters.

A look behind the scenes – Gary designing wheels. Nowadays, he’s designing gauge clusters, ratchet shifts and more for our Build Ninja community!

“I sort of got a bit carried away, the Jenvey ITB injection, fully built power glide, 12 bolt diff, Willwood brakes, fuel system, there is pretty much nothing on the car that hasn’t been rebuilt, replaced or improved drive line wise.  And all of it is 100% ADR approved and street legal.” He says.

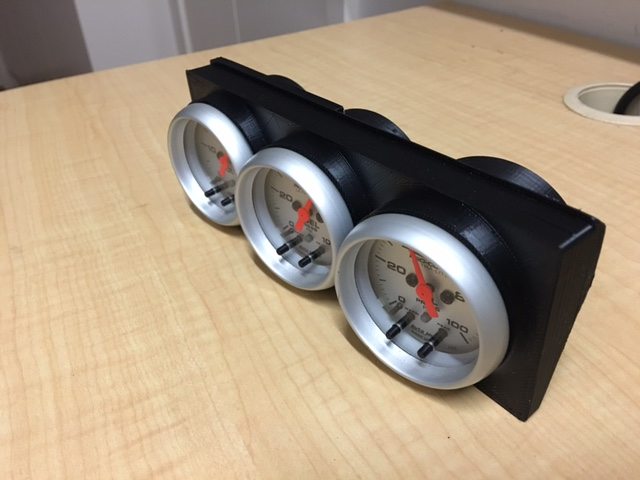
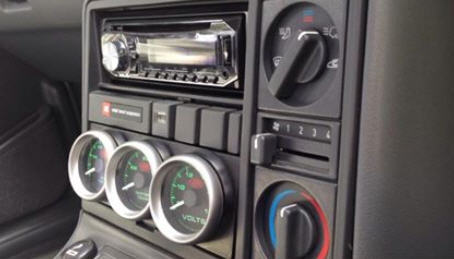
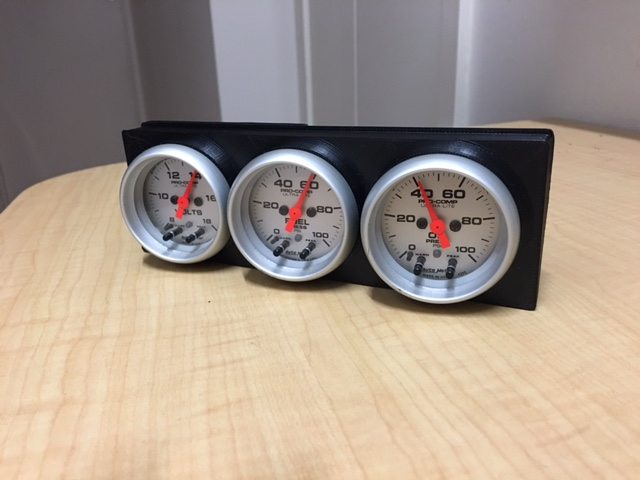
Another part that originally stumped Gary was the gauges.

“I wanted that factory look, and I hated the idea of cutting into the dash. I couldn’t find any Holden gauge clusters that suited what I wanted.”

So, he decided to design his own. Using the CAD skills picked up during his 30 year career, he designed his own gauge clusters and printed and fitted them. These would go on to be the VN – VS Gauge Cluster – the very first product available on the Build Ninja website back in 2016.  

Build Ninja’s first ever product – the VN – VS Under Radio Gauge Mount, in Gary’s very own Holden VR Senator!

Gary reckons that getting HSV454 through engineering was one of the proudest moments of his life, and made all those long hours in the shed worth it.

“I know it sounds corny, but after passing testing, I got in the car in the carpark, wound up the windows, and screamed at the top of my lungs “F@$K Yea, with a huge fist pump”, true story!” He says with a laugh.

Looking good!

After all that hard work, plenty of people would have rested on their laurels (or in this case, in that gorgeous devonish interior). However, Gary’s not one of those people, and he kept looking for ways to improve HSV454.

First it was to make even more horsepower (because you can never have enough – it’s now making 752hp/694ft-lb), and then, he set about fixing a constant gripe – that the awesome glide and ratchet shifter setup he had wasn’t technically street legal.

Gary kept the interior pretty much untouched – apart from a few nifty additions courtesy of Build Ninja!

“I want to be able to drive this car and enjoy it, and so I knew I couldn’t run it if I was risking defect every time it left the shed.”

It was back to the CAD, where Gary designed what would go on to become Build Ninja’s best seller – the Pro Ratchet Shifter Kit

This clever bit of kit means HSV454 – and nowadays, plenty of other builds – can run ratchet shifters totally legally.  Not only being ADR compliant, it also makes driving a ratchet style car on the street so much easier as you instantly know what gear it’s in, day or night.

HSV454 makes a fairly regular appearance on the cruise circuit!

Gary always had a lot of love for HSV454 (his kids, including daughter and business partner Georgie, reckon it’s his favourite child) but knowing it kicked off the community that is Build Ninja makes it even sweeter.

“It’s just awesome that something I loved turned into something that so many others can enjoy as well. I get such a huge kick every time someone sends me a pic or video of their setup, cos I know how much work goes into it and what a thrill it is to see it all coming together.

I love the car community, and being part of someone’s build is just something special.”

How Does 3D Printing Work?

Here at Build Ninja, it’s no secrets that we’re 3D printing enthusiasts. We love the fact that 3D printing makes manufacturing easy and achievable for everybody. Gone are the days where you would have huge minimum runs to make something cool – with 3D printing, it’s easy to print one model, although of course it can always be scaled up, too.

Plus, the options for what can be made with a 3D printer are almost limitless. While here at Build Ninja, we are partial to car parts like our gauge clusters, as well as storage options like our makeup holders, there are people all over the world doing amazing things with 3D printing – even printing body parts! What makes 3D printing so amazing is the flexibility of printing materials. Everything from plastic, wood, metal, and more!

But how does it actually work? Well, probably the hardest part is actually designing what you want to do. This is usually done on a laptop or PC, on one of many different software packages available. It’s not secret that our Build Ninja CAD guru, Gary, is pretty good at this step of the process!

Once the design is sent to the printer, basically 3D printing involves splicing objects up into hundreds, or even thousands, of tiny little layers which are printed one after each other. It sounds pretty easy, but there’s a bit to making sure that it prints correctly, including making sure that the temperature setting is correct, that the object prints solidly, and that the layers are the right depth. Of course, it’s also important to make sure that you choose the right material for your object (and pick a colour you like!)

From here, it’s pretty much just a matter of keeping an eye on it while it prints. We’re not going to lie – it can be a little bit like watching paint dry since it’s not the fastest process! Nonetheless, it’s pretty cool to watch something come alive bit by bit, and we do really enjoy watching our printer in action in our 3d printing lab in Adelaide!

To give you an idea, here’s a short video of our printer in action making an exciting new part:

How to Fit our 3 Gauge Clusters for Commodores

For our second ever blog post, we thought we’d respond to a question that has come up a few times from our awesome customers: how do you fit our 3 gauge clusters?

img_1556

As car people ourselves (Gary with the impressive LSX454 and Georgie with the not so impressive but still lovable Ringo the Campervan), we want our 3d printed car parts to be convenient, and hassle free. While we love tinkering on our cars, we also know the great frustrating that comes when things don’t fit or work right. That’s why we have carefully designed our parts to easily fit into place.

That’s right – no installation or even tools needed. All you need to do is carefully but firmly push the gauge cluster into place (with gauges of course!) and it will hold firmly. No swearing, no tools, no frustration – just a clever, easy to use product that is perfect for your build.

commodore gauge cluster

The ease of use is probably one of the features that have made our 3 gauge cluster our best selling product! However, another great thing about the cluster is that it is super flexible. Thanks to our Adelaide based 3d printing set up, we can easily modify the cluster to suit all types of cars – that’s right, they don’t even have to be Commodores!

Plus, while we think that the cluster looks great straight out of the box, there is plenty of scope for you to add your own touches to make it unique to your build. It is very easy to sand the cluster to get a smoother surface, and you can also easily paint it to match your interior.

3 Gauge Cluster for Commodores

One of our favourite things about being at the helm of Build Ninja is seeing all of the awesome things that our customers do with our products. We’d love to see the finished product once you’ve fitted your gauge holder! Of course, if you do run into any troubles along the way, we’re always on hand to offer advice and assistance. We’re not just a shop, we’re enthusiasts who’ve been there – and we only want the very best for your build!

PS – We’d love to hear your ideas for topic for our blogs. If you have any questions you’d like answered, or ideas for a topic, shoot us a message at hello@buildninja.com.au or on Facebook, and we’ll do our best to address it!

Welcome to the Build Ninja Blog

Welcome to the first ever post in our brand new, Build Ninja Blog! Every week you can expect to hear news, updates and musings from the team at Build Ninja.

Who is Build Ninja?

Here at Build Ninja, we’re not just a faceless organisation! Instead, we’re a small but dedicated duo made up of father-daughter team Gary and Georgie McRae.

We started Build Ninja due to our mutual passion for “making cool stuff”, as well as our respective experience. Gary has over 30 years experience as a design drafter, even taking out the prestigious AutoCAD user of the year for the whole of Australasia! While Georgie doesn’t have anything quite that impressive to her name, she does love technology and websites which comes in handy.

What does Build Ninja do?

The short answer is – anything we can 3D print! Build Ninja sells a range of different products that have been dreamt up by Gary & Georgia and are now for sale in our shop. However, we also would love to help you bring your ideas to life and so we have 3D printing and custom order services, too.

With our 3D printing services, you can bring us your design and we’ll make sure it’s printed correctly with the right materials. Whether it’s a custom part that you’ve designed for your build, or just something cool you’ve thought up and want to see come to life, we’re happy to print it out.

If you haven’t got your design, but you’ve got a cool idea, we’d still love to hear from you! We consider Gary a bit of an expert when it comes to bringing ideas to life, so he’ll be happy to chat with you and get to work designing & making something awesome.

I want to find out more!

Awesome – we’re happy to tell you more! We’d love you to follow us on Facebook, where you can keep up to date and also send us a message. You can also join our monthly newsletter, Build Ninja News, where you’ll keep on top of all of our happenings! Finally, if you’d like to speak directly to us about what Build Ninja can do for you, head on over to our contact us page and let’s get chatting!

Search for products

Back to Top
Product has been added to your cart